The Sync Directories tool in FileVoyager allows users to synchronize the contents of two directories. This feature is ideal for keeping folders up-to-date, ensuring that files are consistent between different locations, and performing backups. Users can plan synchronization by setting up sync directions for individual items before committing to the actual sync operation.
Features
- Folder Comparison: Compare the contents of two directories to identify differences.
- Item-by-Item Sync Direction Setup: Plan your sync by setting the sync direction for each item individually.
- Batch Sync Direction Setup: Select multiple items and set their sync direction simultaneously.
- Preview Sync Actions: Review planned sync actions before applying them.
- One-click Synchronization: Apply all planned sync actions with a single click.
- Conflict Resolution: Identify and resolve conflicts before synchronizing.
How To use
Accessing the Folders Comparison Tool
- Open FileVoyager.
- Navigate to the Tools menu.
- Select Compare listed paths from the menu.

Anatomy of the Folder Comparison tool

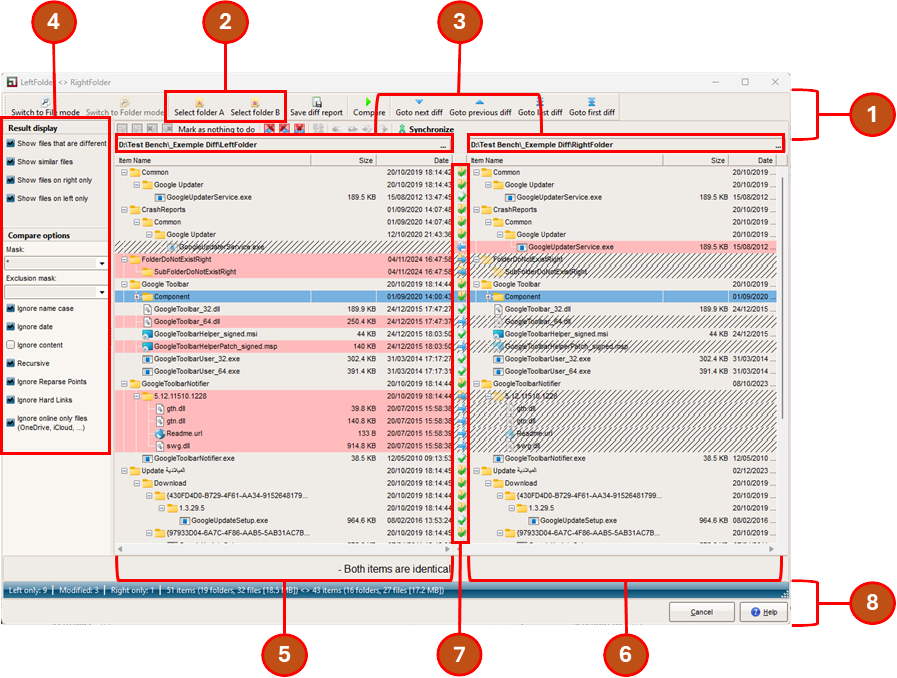
- Main toolbar
- Folder selection buttons
- Paths of the current folders being compared + Browse button to select a folder (…)
- Side panel with display and compare options
- Left panel, or panel A
- Right panel, or panel B
- Sync status icons
- Status bar showing a summary of the differences
Performing Directory Synchronization
Step 1: Select Directories
- Select Source Directory:
- Click the source directory input box, or the Browse (…) button next to the directory input box and select the directory you want to synchronize as Left folder (A). Alternatively you can click on the Select folder A button on the main toolbar.
- Select Target Directory:
- Click source directory input box, or the Browse (…) button next to the target directory input box and select the directory you want to synchronize as Right folder (B).

Step 2: Compare Directories
- Click the Compare button to compare the contents of the selected directories.
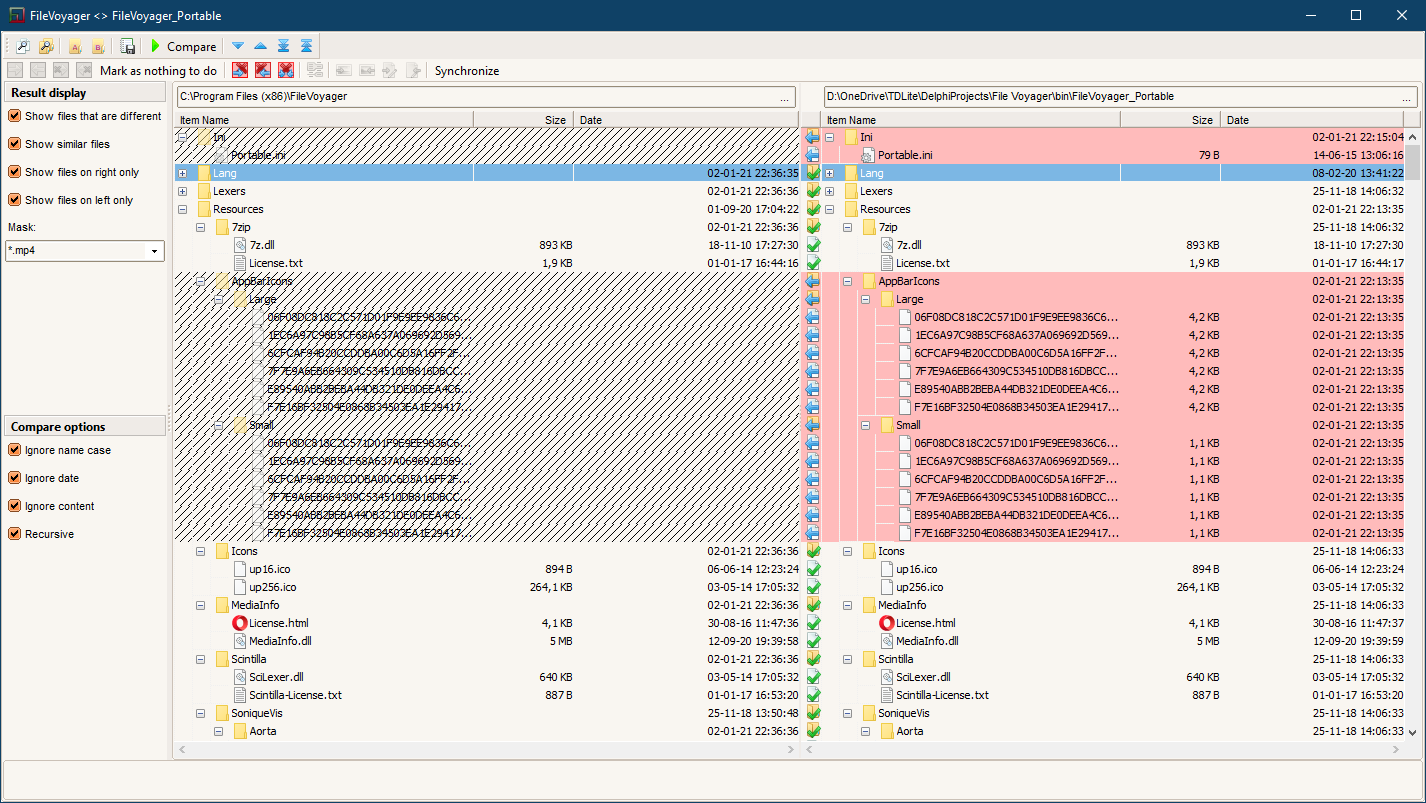
- The contents of the directories will be displayed side-by-side with differences highlighted.

Step 3: Set Sync Directions
When the Compare is over, items are displayed in treeview mode on the right and on the left. Both panels are separated by a Sync status column (see #7 in the picture above). The icons are just indicators of the differences, and they don’t indicate that the items will be handled in whatever way when the Synchronize action is started. Those icons correspond to “Nothing To Do”.
| The folders are identical on both sides in terms of content, but differ in attributes such as the date and the case of their names. | |
| The files are considered identical on both sides based on the selected comparison options. | |
| The folder only exists on the left side. The icon indicates that it can be synchronized from left to right. | |
| The file only exists on the left side. The icon indicates that it can be synchronized from left to right. | |
| The folder only exists on the right side. The icon indicates that it can be synchronized from right to left. | |
| The file only exists on the right side. The icon indicates that it can be synchronized from right to left. | |
| The folders on both sides differ, not in their content, but in attributes like the date and the casing of their names. | |
| The files are considered different on both sides according to the selected comparison options. |
- Item-by-Item:
- For each item (file or sub-directory), choose the sync direction by clicking the icon separating the two sides, or by right-clicking an item.
- Batch Selection:
- Select multiple items, by holding the
Ctrlkey orShiftkey, and clicking on items. - Right-click the selected items and choose the desired sync direction from the context menu.
- Select multiple items, by holding the
The context menu that shows up is composed as follow:

| Mark for copy left to right | – Mark selected files for a copy from the left folder to the right folder. – The effective copy will only take place after the user clicks on Synchronize. – If the file already exist on the right folder, the user will be prompted to accept overwrites or not. | |
| Mark for copy right to left | – Mark selected files for a copy from the right folder to the left folder. – The effective copy will only take place after the user clicks on Synchronize. – If the file already exist on the right folder, the user will be prompted to accept overwrites or not. | |
| Mark for move left to right | – Mark selected files for a move from the left folder to the right folder. – The effective move will only take place after the user clicks on Synchronize. – If the file already exist on the right folder, the user will be prompted to accept overwrites or not. | |
| Mark for move right to left | – Mark selected files for a move from the right folder to the left folder. – The effective move will only take place after the user clicks on Synchronize. – If the file already exist on the right folder, the user will be prompted to accept overwrites or not. | |
| Mark as nothing to do | – Exclude the item from synchronization. | |
| Suppress from left | – Delete the left item. – A confirmation dialog appears before deletion. – This operation is immediate after confirmation, and doesn’t need Synchronize event. | |
| Suppress from right | – Delete the right item. – A confirmation dialog appears before deletion. – This operation is immediate after confirmation, and doesn’t need Synchronize event. | |
| Suppress from both sides | – Delete both left and right items. – A confirmation dialog appears before deletion. – This operation is immediate after confirmation, and doesn’t need Synchronize event. | |
| Compare files | – Compare the left and right files. – Click for more info on File Comparison tool. | |
| Quick view left file | – Launch the Viewer to render the left file. – Click for more info on Viewer. | |
| Quick view right file | – Launch the Viewer to render the right file. – Click for more info on Viewer. | |
| Edit left file | – Launch the default file editor configured. | |
| Edit right file | – Launch the default file editor configured. |
Step 4: Review and Synchronize
- Preview Sync Actions:
- Review the planned sync actions before synchronizing.
- Synchronize:
- Click the Synchronize button to apply all planned sync actions.
Attention point: Synchronization operations cannot be undone. Ensure you review all planned sync actions carefully before committing.
Result display
- Show files that are different: Toggle this option to display or hide files that exist on both sides and that are different.
- Show similar files: Toggle this option to display or hide files that exist on both sides and that are identical.
- Show files on right only: Toggle this option to display or hide files that exist only on the right side (B).
- Show files on left only: Toggle this option to display or hide files that exist only on the left side (A).
Compare options
- Mask: Type, or select from the dropdown list, a file mask en press ENTER to display only files matching the mask filter (e.g.
*.txtor*IMG*.jpg) - Exclusion mask: Type, or select from the dropdown list, a file mask en press ENTER to hide files matching the mask filter (e.g.
*.txtor*IMG*.jpg) - Ignore Name Case: Toggle this option to ignore or take into account the case of the file names.
- Ignore date: Toggle this option to ignore or take into account the dates of the files
- Ignore Content: Toggle this option to compare files by content (slower) or to ignore content (faster).
- Recursive: Toggle this option to include all the subfolders of the selected directories
- Ignore Reparse Points: Skips folders that are actually links to other locations, such as junctions or symbolic links, preventing the comparison from following those paths.
- Ignore Hard Links: Prevents the comparison of files that point to the same disk content via multiple directory entries.
- Ignore Online Only Files (OneDrive, iCloud, …): Skips cloud-based files not stored locally, avoiding their download during comparison.
Use Cases
- Backup: Keep a backup directory synchronized with your main working directory.
- Collaboration: Ensure that shared directories are up-to-date for all collaborators.
- Data Migration: Move files from one location to another while keeping both locations synchronized during the transition.
Troubleshooting
- Large Directories: For very large directories, the comparison and synchronization process might take some time, especially if Ignore content option is active. Ensure your system has sufficient resources.
- Permissions Issues: Ensure you have the necessary permissions to read from both directories and write to the target directories.
- Network Drives: When synchronizing directories over a network, ensure that the network connection is stable to avoid interruptions. Synchronization accross Network Drives can also be way slower, even with a very performant network.


You must be logged in to post a comment.